Easter Eggs-travaganza, day 11: Happy Easter!

monster

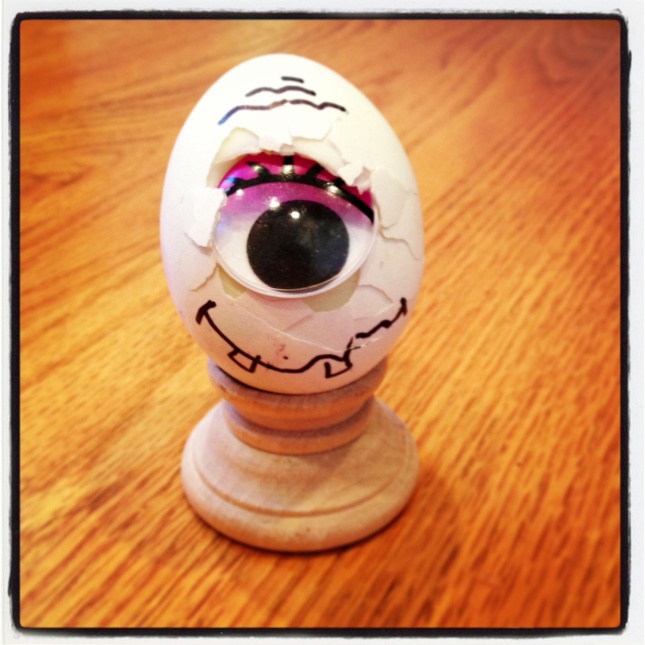
I apologize for posting too early but we are off for a 2-week vacation in the morning. So, happy Easter! The last project that I wanted to share today was an Egg-monster. We made this one as a snack and it was as tasty as it was scary 🙂 Just boil an egg, make a hole in the shell, take a little piece out and put a googly eye inside. Then kids can decorate their monster with markers… and peel it and eat it. Yummy!

And if you still need more ideas and inspiration, check out the Pinterest board or our Instagram.

Easter Eggs-travaganza, day 10: Completely Melted

fingerpainting_egg

This time, we shredded the crayons (like here) but used very hot, boiled egg. It melted all of the pieces and created a texture on the surface. We patted it with paper towel a little and when it cooled down a little, we colored it. Then we added some “flowers” – dots of acrylic paint onto the beautiful texture.

Easter Eggs-travaganza, day 9: The Golden Egg

blue_gold

We had some leftover golden spray at home (from changing rocks into golden pieces for our treasure hunt… but that’s a different story)… so we decided to make an golden egg. But we wanted to make it a little more personal. So, we first colored it blue (this year’s favorite color), then sprayed it a little and tapped it with a paper towel to create fun texture (good way to introduce solid/texture concept to kids). When it dried, we took a sharpie and added even more texture to it. My 2-year old tried sign the egg couple of times – in case you were wondering.

Easter Eggs-travaganza, day 8: Good old Finger-painting

fingerpainting_only

The Egg decoration would not be complete without some good old-fashioned finger-painting. Just color the eggs and let you little ones explore the paints, mixing of the paints, how they look on different colored backgrounds…  the results may pleasantly surprise you (plus it is not difficult or scary for the little ones…  and it is fun to paint on 3D object).

Easter Eggs-travaganza, day 7: Shred that Crayon

blue_egg

This was a fun project and the results reminds me a little bit of Japanese-style paintings (something I truly did not expect). This is how it’s done: Shred some crayons, mix the colors and sizes… then boil an egg and roll it in it (be careful, if the egg is too hot it will melt all of the pieces and will not give you the right effect). Then color the egg and you are done. This is a really simple wax-resist project that is fun for the kids. I mean, when do you get to “destroy” your drawing tools?

3-26 Easter Eggs-travaganza, day 6: Pisanky for Preschoolers

pisanky

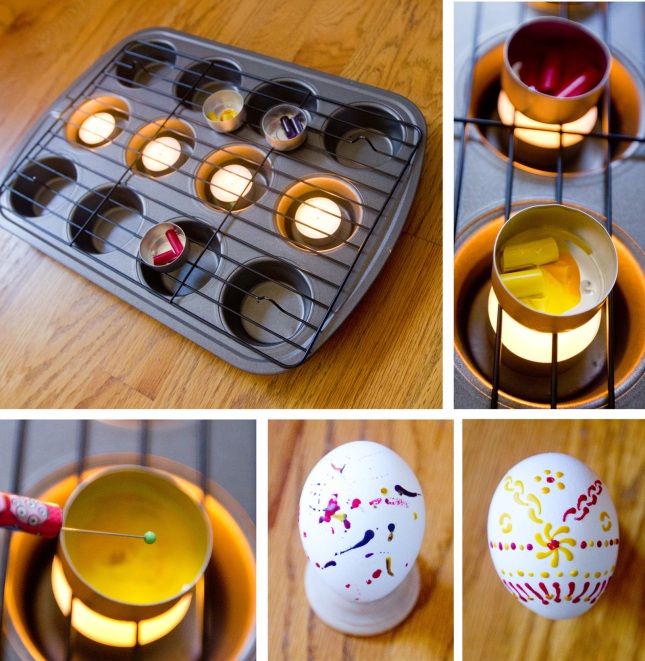
Pisanky are Ukrainian Easter eggs that are done with bee-wax and a special tool. The wax is melted and then it is applied onto a white egg. Then you color the egg, add more wax, color again… until you achieve the right effect. After that you take the egg close to fire and melt the wax away to reveal the colorful lines underneath. I have always love it and wanted to share it with my kids… so this is a simplified version.

Take a muffin tin and put small candles inside. Put a wire mash or grid onto it – that’s your oven. Then, take couple of the metal containers for the candles and put wax crayons inside. Let them melt (but be careful not to burn them).

For your drawing tool, just take a pencil and stick a sewing pin in it. Now, you are all set. If you want to try it too, there is some inspiration (I used to do these… before kids):

pisanky_all

Easter Eggs-travaganza, day 5: The Naked Egg

egg_without_shell

So, technically it is not an art project but it is a fun science experiment… how does an egg look like without the shell? The raw egg I mean… like a gooey bouncy…  try it for yourself. You need couple of raw eggs (they can break easily once you start exploring them, so making more is a good idea). You put them in a jar with a lid and pour vinegar over them. The just let them stand 2-3 days… drain the vinegar, Raise them with cold water and let the exploration begin.

Easter Eggs-travaganza, day 4: Bubble-wrap

bubble_rwap

This has been our favorite technique as well. Use watercolors to paint on a bubble wrap instead of on the paper. Kids think it is really fun and they love stamping with it. I’d recommend to cut the wrap into small pieces, the bigger ones can get very difficult to handle… and if your kids decide (like mine) to stamp their face, it will cover only a small part.

Easter Eggs-travaganza, day 3: Salt & Watercolors

salt_watercolored_eggs

One of my favorite watercolor technique is using salt. It is very simple, the results are beautiful and it beautifully combines science and art.

Let the kids use watercolors – any way they want to and when they are done (and the painting is not dry yet), sprinkle some salt on it (we used just regular salt but the rock/ice-cream salt is great too). Then let it dry, get the salt off and you are done… almost.

We decided to cut out Easter eggs out of the paper and they played with different ways we could use them. We made a paper-plate nest for them, we cut it in half and made a chicken that was just about to hatch from one, we used glitter glue to make it even fancier, made a 3D egg to stick in out flowers, used sharpies to draw simple lines and patterns… and stuck some on black paper (and wow, did they stood out!). I am sure you can come up with even more ideas… unfortunately, we ran out of the eggs at this point 🙂

Btw, if you want to explain your kids how the salt affects the paint… here is an idea I read somewhere. You may want to emphasize the idea that salt absorbs water by asking them how they feel after eating very salty chips. They get thirsty because the salt absorbs the water in their bodies just like it absorbs the water in their paintings. Simple for even a 3-year-old to understand.